A DIY edible arrangement is a thoughtful, creative, homemade gift for a friend, family member, or loved one for so many different occasions.
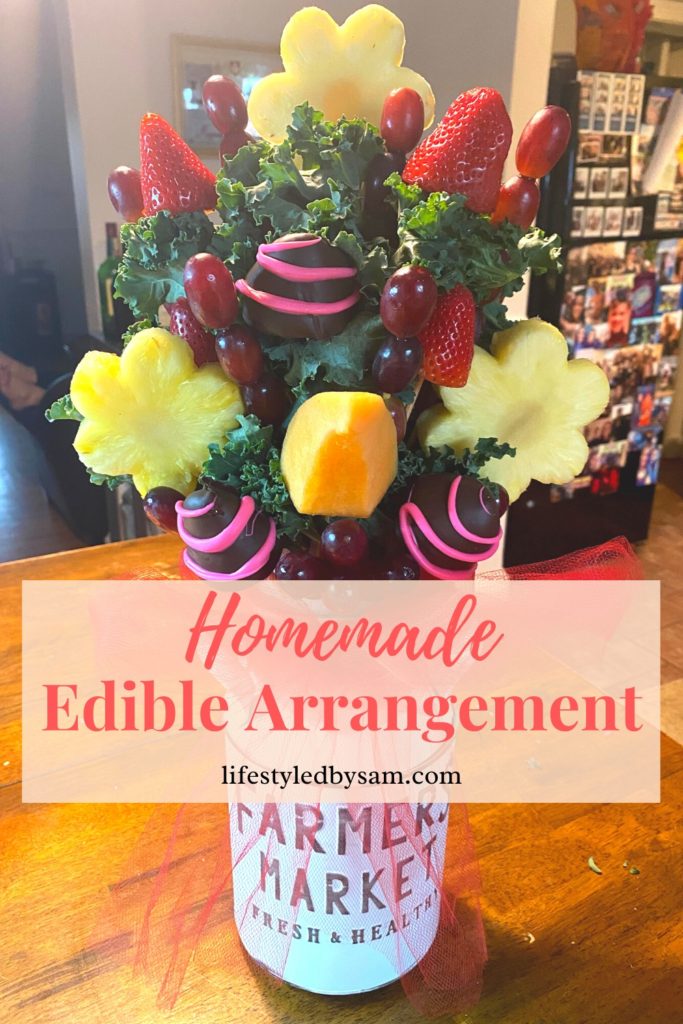
DIY Edible Arrangement
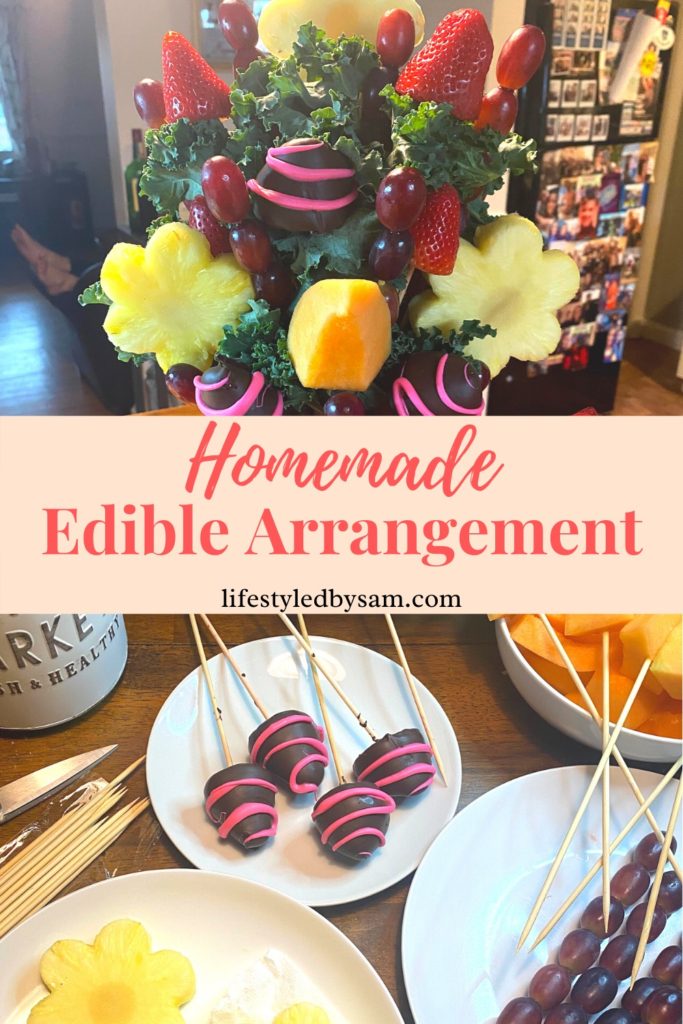
Are you looking to impress your guests with a stunning and delicious centerpiece for your next gathering? Look no further than a DIY Edible Arrangement! Creating your own fruit bouquet is not only a creative and fun project, but it also adds a touch of elegance and freshness to any occasion. In this blog post, we will guide you through the process of making your own edible arrangement, featuring vibrant fruits, pineapple flowers, chocolate covered strawberries, and melon balls. Get ready to unleash your inner artist and create a mouthwatering masterpiece that will leave everyone in awe.
Ingredients To Make A Homemade Edible Arrangement
The following ingredients are used in this edible arrangement:
- Pineapple
- Cantaloupe
- Strawberries
- Grapes
- Kale
- Chocolate melts
Substitution Considerations
If you want to substitute fruits based on what is in season, here are a couple of things to keep in mind:
- Bananas: because they brown pretty quickly, I don’t recommend adding bananas to your arrangement, unless they are dipped in chocolate.
- Honeydew: while honeydew is often a substitute for cantaloupe, I prefer to stick with cantaloupe to add a pop of orange (kale is already adding green to your assortment).
- Berries: who doesn’t love blueberries, blackberries, or raspberries? Not only are berries delicious, but the colors and texture make your assortment pop. However, due to the small size, berries generally look lost in edible arrangements.
Equipment To Make A Homemade Edible Arrangement
This is a long list, but you probably already have most of these items at home 🙂
- Vase
- Ribbon
- 10″ wooden skewers
- Chef’s knife
- Cutting board
- Flower cookie cutter
- Scissors
- Baking sheet
- Paper towels
- Microwave-safe bowl
- Parchment paper
- 4″ Styrofoam sphere
- Glue gun
Best Occasions For An Edible Arrangement
There are so many great occasions to give an edible fruit bouquet! Here are some of our favorites:
- Mother’s Day
- Easter
- On A Mimosa Bar
- Graduation
- Congratulations
- Birthday
- Thank you
- Just because
How to Make Edible Arrangements Step by Step
Here’s a quick video on how to make your own edible fruit arrangement and below are the detailed instructions.
Step 1: Attach The Vase To The Styrofoam Sphere
Using a glue gun, generously apply glue to the inner rim of the vase. Insert the 4″ styrofoam sphere. Half of the sphere should fit into the vase. Apply pressure between the sphere and the vase for about 30 seconds while the glue dries.
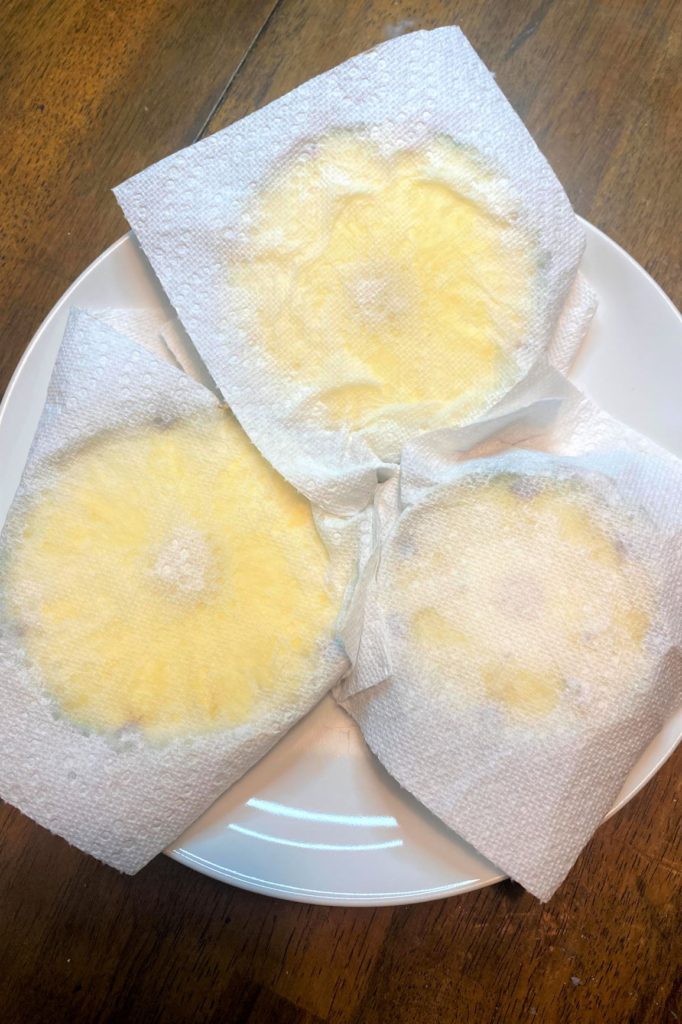
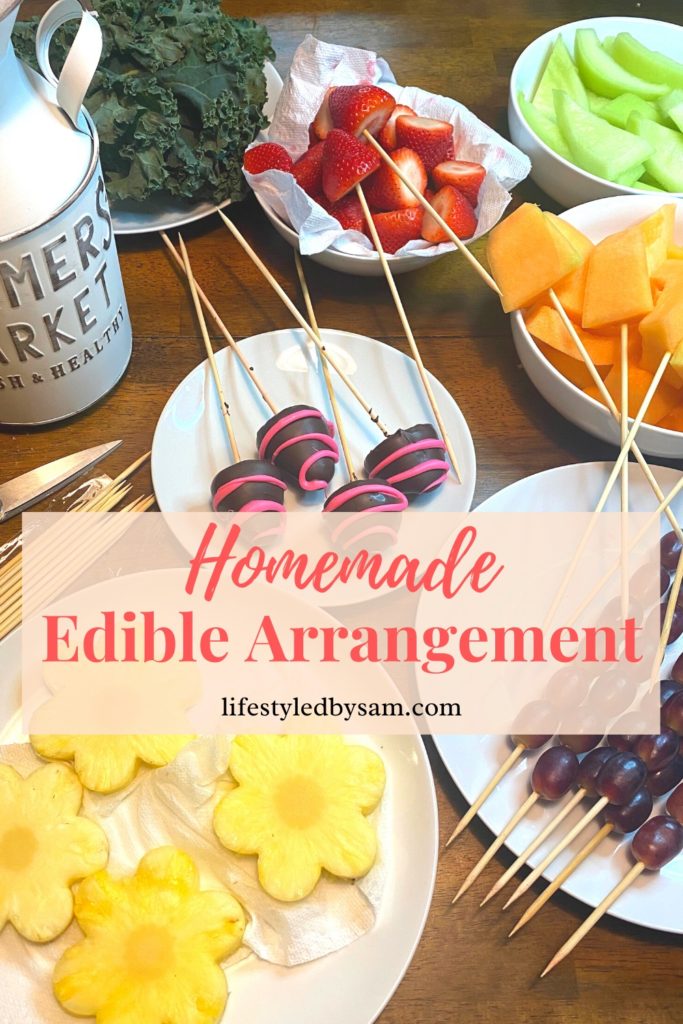
Step 2: Wash, Cut, And Dry The Fruit
Once you have washed and cut the fruit as described below, then wrap the cut fruit in paper towels for about 20 minutes. Removing excess liquid from the fruit will help the fruit last longer and prevent them from falling off the skewer (due to being soggy).

How to Cut Fruit for Edible Arrangements
Pineapple
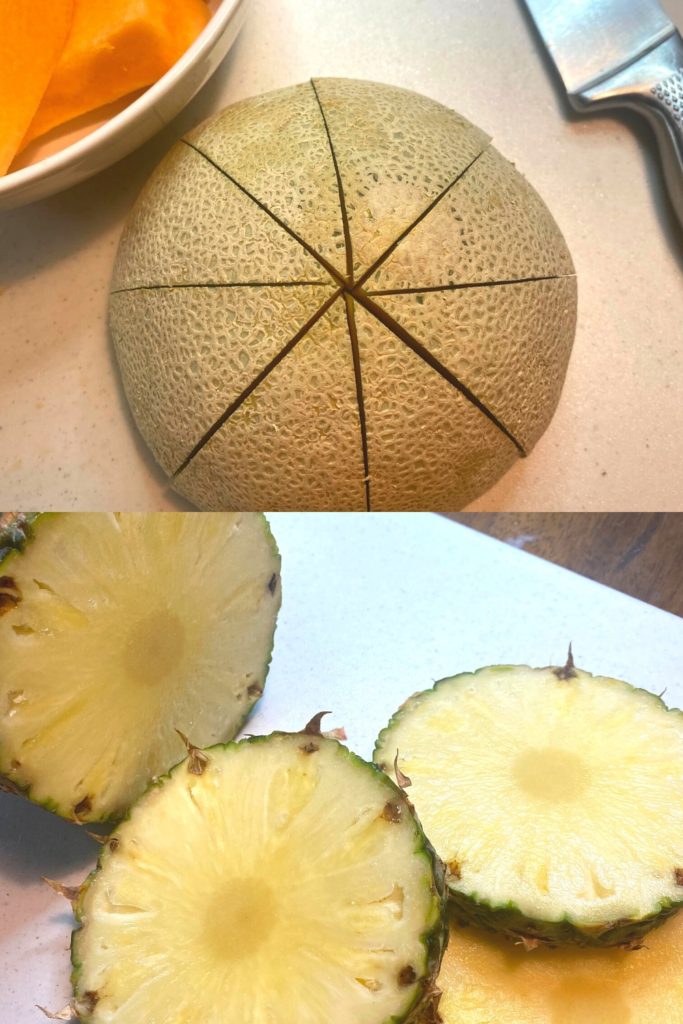
Cut off the top and bottom of the pineapple.
Place the pineapple on its side and cut 1/2 inch ‘slices’ (like pancakes), as pictured above.
After you wrap the slices in paper towels for 20 minutes, then create flowers using this cookie cutter.
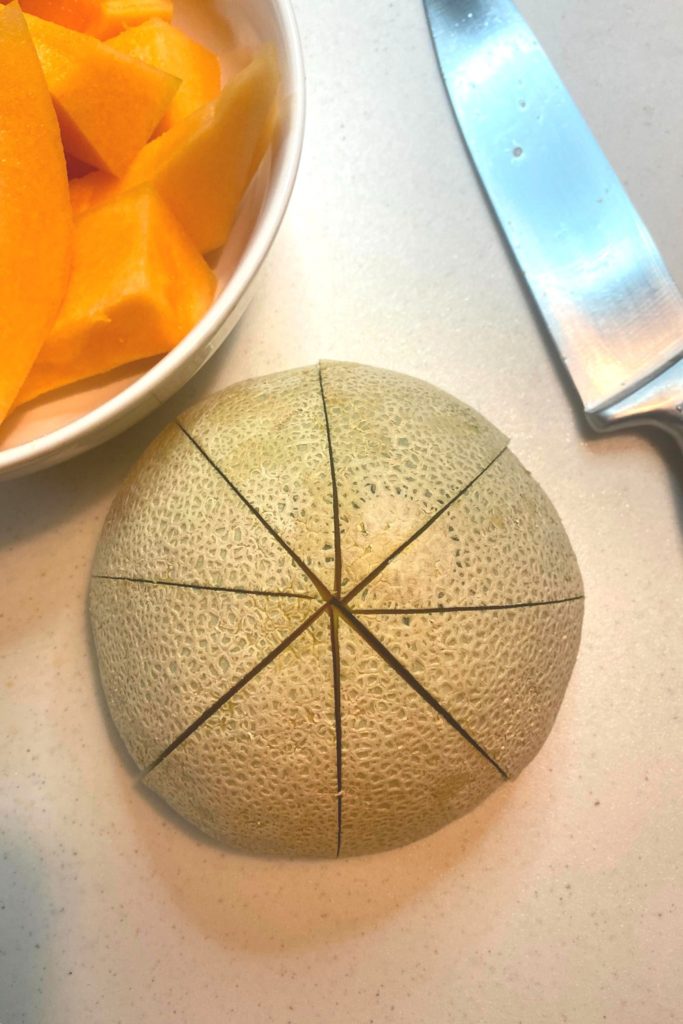
Cantaloupe
First, cut the cantaloupe in half widthwise (not lengthwise).
Next, remove the seeds using a spoon.
Then, place the 1/2 cantaloupe face down on a cutting board and create 8 equal pieces (like a pizza), as pictured below. Finally, remove the rind.
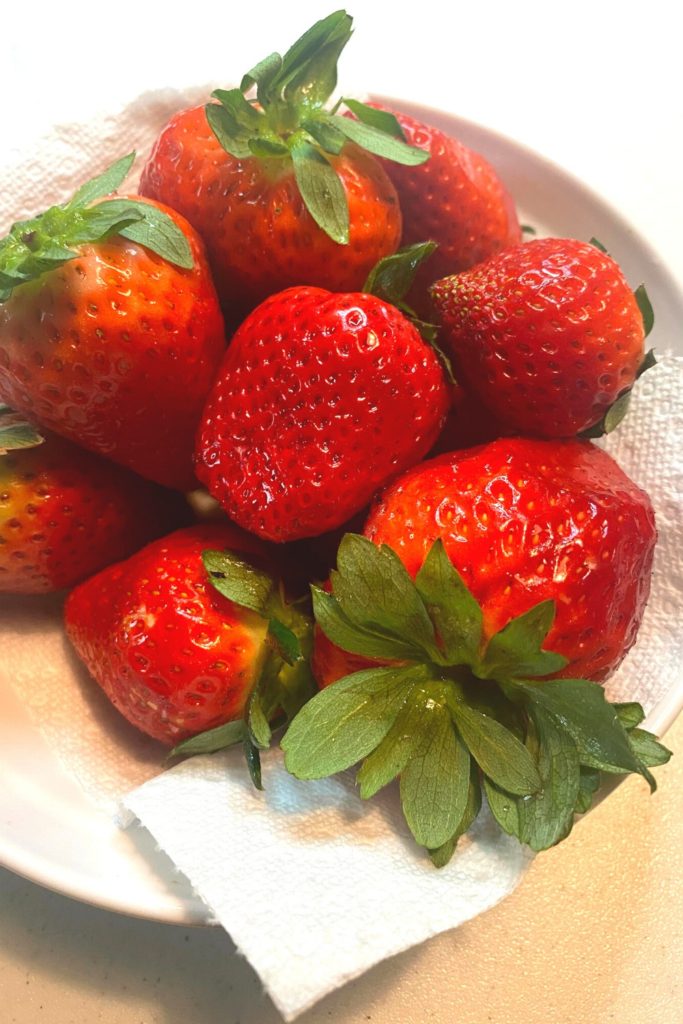
Strawberries
Start by washing the strawberries and drying them with a paper towel. Then, cut off the top stems and the strawberries are ready to be dipped in chocolate (Step 3).
Red Grapes
Remove the grapes from the stalk. Then, wash the grapes and dry them off with a paper towel.
There’s no need to cut the grapes.
Step 3: Dip Strawberries In Chocolate
Melt your favorite chocolate melts in a microwave-safe bowl according to the package instructions.
Next, individually dip strawberries into the melted chocolate and transfer it to parchment paper to dry.
Step 4: Add Fruit To The Skewers
Add a single piece of pineapple, cantaloupe, or strawberry per skewer. Add 4 – 5 grapes per skewer.
Step 5: Insert Skewers Into The Styrofoam
Now’s the time to get creative! Or, if you prefer more structure, think about a clock. Here’s what I mean:
- 12 o’clock position: pineapple skewer
- 1 o’clock position: strawberry skewer
- 2 o’clock position: grape skewer
- 3-4 o’clock position: pineapple skewer
- 5 o’clock position: chocolate-covered strawberry skewer
- 6 o’clock position: cantaloupe skewer
- 7 o’clock position: chocolate-covered strawberry skewer
- 8-9 o’clock position: pineapple skewer
- 10 o’clock position: grape skewer
- 11 o’clock position: strawberry skewer

Step 6: Fill Gaps With Kale
Add kale to fill in gaps in your arrangement, hide skewers, and make your arrangement appear more professional.
Step 7: Tie A Bow Around The Vase
You’re almost done! Bring it all together with a big red bow (or color of your choosing).

Tips For A Homemade Edible Arrangement
1. How To Store Leftover Fruit
Unless you go all-out on your homemade edible arrangement, you will have leftover fruit. The best way to store leftover fruit is in individual Tupperware containers with a paper towel. I have found that storing fruit separately (instead of mixed) will keep the fruit fresher longer.
2. Strive For Symmetry
Aside from visual appeal, symmetrical arrangement is important to equally distribute the weight of the fruit. This is critical to ensure the vase can stand without additional support. However, as an extra precaution, you may add marbles, pebbles, shells, etc. to the bottom of your vase to make it more sturdy. Keep in mind, if you are using a glass vase, you will be able to see the filler in the arrangement.
3. How To Transport An Edible Arrangement
Unlike professionally-made edible arrangements, this one won’t travel well. This is probably the biggest downside of homemade versus professional. To transport mine, I wrapped it loosely, and generously, in plastic wrap and created a ‘holding space’ using Amazon boxes and my over-night bag in my car. If you happen to have someone that can hold it while you drive, that is definitely ideal, however, not always feasible.
Conclusion
In conclusion, crafting your own DIY Edible Arrangement is a fantastic way to showcase your creativity while delighting your guests with a stunning and scrumptious centerpiece. By combining fresh fruits, pineapple flowers, and melon balls, you can create a visually appealing display that is as pleasing to the eyes as it is to the taste buds. Whether you’re hosting a special occasion or simply want to elevate your everyday dining experience, an edible arrangement is a great choice. So grab your melon baller, cookie cutters, and skewers, and let your imagination run wild as you bring forth a bouquet of flavor and beauty. Enjoy the process, and remember to savor every sweet and juicy bite of your edible masterpiece. Cheers to the artistry of fruit and the joy it brings to our tables!
How far in advance can I make an edible arrangement?
You can prepare an edible arrangement a day ahead of your planned event or gathering. This allows enough time for the fruits to be freshly assembled and stay vibrant and delicious. However, it’s important to note that certain fruits, especially delicate ones like strawberries, may begin to lose their freshness and texture if prepared too far in advance. To ensure the best quality, it’s recommended to assemble the arrangement no more than 24 hours before serving.
How do you make fruit-like edible arrangements?
To make a fruit-like edible arrangement, start by selecting a variety of fresh fruits such as melons, pineapples, strawberries, grapes, and any other fruits of your choice. Wash and thoroughly dry the fruits. Use a melon baller to create uniform melon balls and set them aside. Cut the other fruits into attractive shapes, such as slices, wedges, or flower petals, using flower-shaped cookie cutters or a sharp knife. Thread the fruits onto skewers, alternating the different types and shapes to create a visually appealing arrangement. You can also add pineapple flowers, made by slicing a fresh pineapple into thin rings and shaping them into flower shapes. Place the skewers into a vase or container filled with floral foam to keep them upright and secure. Arrange the fruits to fill the vase, ensuring there are no empty spaces. Finally, add any additional decorative touches, such as tissue paper or mini marshmallows, if desired.
How do you make edible fruit flowers?
To make edible fruit flowers, you can use pineapple slices or flower-shaped cookie cutters to create the desired shapes. If using pineapple slices, carefully cut a fresh pineapple into thin rings. Use flower-shaped cookie cutters to cut out flower shapes from the pineapple slices. If you prefer, you can also shape the pineapple slices into flower shapes by cutting slits along the rounded edge and bending the edges backward to create a petal-like appearance. Insert a wooden skewer through the stem end of each pineapple flower to create the stem. You can then attach the pineapple flowers to the skewers along with other fruit pieces, such as strawberries or grapes, to create a beautiful and edible fruit flower arrangement.
Do you put a DIY edible arrangement in the fridge?
Yes, it is recommended to store an edible arrangement in the refrigerator to keep the fruits fresh and maintain their quality. Place the arrangement in a container or cover it with plastic wrap to prevent the fruits from drying out. It’s best to serve the edible arrangement within 24 hours to ensure optimal taste and texture. Remember to take the arrangement out of the fridge about 30 minutes before serving to allow the fruits to come to a slightly cool room temperature for the best flavor.
How long can a homemade edible arrangement stay out of the fridge?
A homemade edible arrangement can stay out of the fridge for a limited amount of time to ensure the freshness and safety of the fruits. It is recommended to keep the arrangement at room temperature for no more than 2 hours. After that, the fruits may start to lose their freshness and become susceptible to bacterial growth.
To maintain the quality of the edible arrangement, it’s best to refrigerate it when not actively serving or displaying it. Place the arrangement in a container or cover it with plastic wrap to protect it from air exposure. This helps to prevent the fruits from drying out and maintains their flavor and texture.
Remember to take the arrangement out of the fridge about 30 minutes before serving to allow the fruits to come to a slightly cool room temperature for the best taste. If there are any leftovers, promptly refrigerate them and consume them within 24 hours to ensure food safety and optimal quality.
By following these guidelines, you can enjoy your beautiful and delicious edible arrangement while keeping the fruits fresh and enjoyable for as long as possible.
Homemade Edible Arrangement

A homemade edible arrangement is a thoughtful, creative, DIY gift for a friend, family member, or loved one for so many different occasions.
- Prep Time: 45 minutes
- Total Time: 1 hour 30 minutes
- Yield: 6 1x
- Category: Appetizer, Breakfast, Dessert, Side Dish, Snack
- Cuisine: American
Ingredients
- 1/2 whole Pineapple
- 1/4 whole Cantelope
- 1 pint Strawberries
- 1.5 lbs Grapes (red)
- 1 bunch Kale
- Chocolate (dark)
- Chocolate (pink)
Instructions
- Attach the vase to the styrofoam sphere using a glue gun.
- Wash, cut, and dry the fruit.
- Dip the strawberries in melted chocolate.
- Add fruit to the skewers.
- Insert skewers to the styrofoam.
- Fill in any ‘gaps’ with kale.
- Tie a big bow around the vase.
Notes
*Size of the styrofoam sphere depends on the diameter of the vase. The styrofoam sphere should fit halfway in the vase/bucket.
Keywords: Fruit
We hope you enjoyed this post and now feel confident to make edible arrangements at home!
If you have any questions, leave a comment below and we will get back to you asap.


[…] Homemade Edible Arrangement (will look so pretty on your mimosa bar) […]