How to make a rainbow fruit tray and ideas for all occasions. A rainbow fruit platter doesn’t require a complex recipe or ingredients and it doesn’t require cooking or baking. Simply pick a colorful variety of your favorite fruits or stick to what is in season.
Related: Homemade Edible Arrangement

Rainbow Fruit Tray
If you stumbled across this page while you were checking out my Pride Recipes, St. Patrick’s Day Recipes, or Pinterest, you may be wondering:
“Why is there an entire post dedicated to arranging some fruit on a cutting board”?
Honestly, fair question. However, there are actually quite a few important considerations when preparing a fruit tray.
Such as: “How do I prevent my fruit from getting soggy” or “Can I prepare this fruit tray in advance” or “How much fruit do I need”?
Also, below, I provide a ton of ideas for when to serve your rainbow fruit tray.

Table of Contents: Rainbow Fruit Tray

List of Fruits By Colors
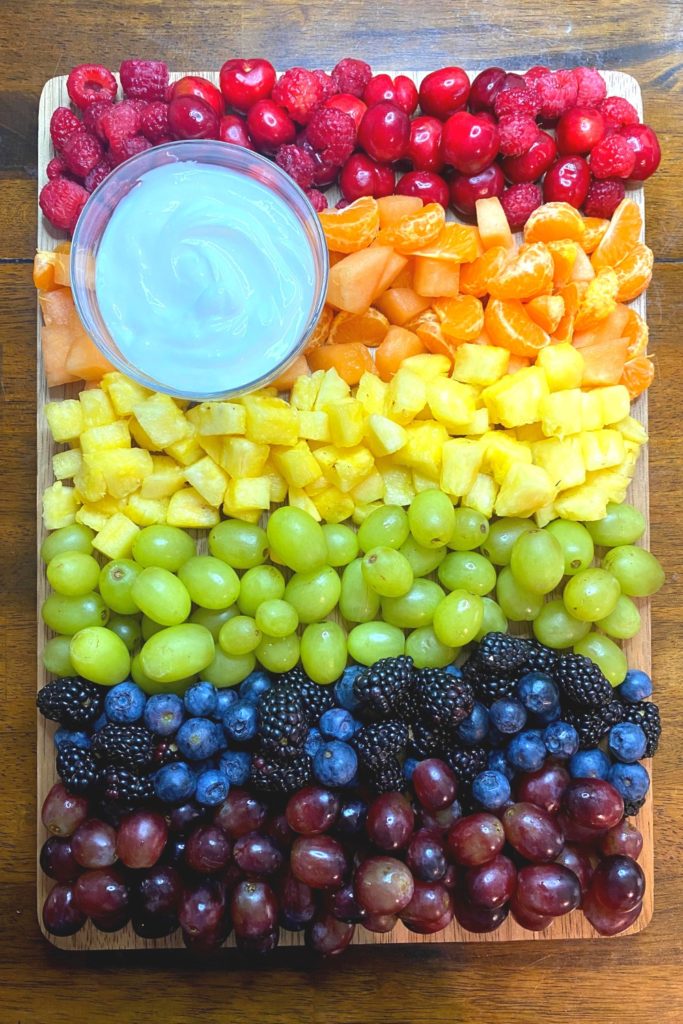
For this rainbow fruit tray, I used raspberries, cherries, clementines, cantaloupe, pineapple, green grapes, blackberries, blueberries, red grapes.
However, you have a variety of options and can choose based on what is in season and/or on sale:
- Red: cherries, raspberries, strawberries, cranberries
- Orange: cantaloupe, clementines, mango, oranges
- Yellow: pineapple
- Green: green grapes, honeydew, kiwi
- Blue: blueberries, blackberries
- Purple: red grapes

Fruits To Avoid For A Fruit Tray
- Apples: I love a fresh, crisp apple, but it browns quickly. If you are determined to include apples, make sure you spray lemon or lime juice on the apple slices, to prevent the apples from browning as quickly.
- Bananas: Avoid bananas for the same reasons as apples.
- Pears: Avoid bananas for the same reasons as apples.
- Plumbs: Unfortunately, there aren’t many purple fruits that work well for a fruit tray. I recommend sticking with red grapes.
- Watermelon: The best watermelon is juicy, but it will make your fruit tray soggy quickly.

What You Need To Make A Rainbow Fruit Tray
- Serving tray: to present your fruit arrangement.
- Cutting board: to cut fruit like canteloupe, pineapple, etc.
- Chef’s knife: to cut fruit like canteloupe, pineapple, etc.
- Mixing bowls: to mix multiple fruits of the same color.
- Sauce bowls: to serve fruit dip, chocolate, peanut butter, etc.

How To Make A Rainbow Fruit Tray
Making a fruit tray seems pretty self-explanatory, but there are actually some important details to consider during the process. Check out each step, in detail, below.

1. Prepare The Fruit Dip
Fruit dip is optional. If you are including fruit dip in your tray, I recommend preparing it first, to get it out of the way. You have three options for fruit dip:
- Store-bought ingredients: this category is the easiest, and you probably already have most options at home. Think yogurt (what I used), Cool Whip, peanut butter, Nutella, etc.
- Store-bought fruit dip: the most common fruit dip brand is Marzetti. You can choose from a variety of flavors, such as strawberry, chocolate, and cream cheese.
- Homemade fruit dip: there are the most options in this category. I like this 2-ingredient fruit dip recipe by Spend With Pennies.
2. Prepare The Fruit
Wash and dry the raspberries, cherries, grapes, blueberries, and blackberries.
Peel the clementines.
Remove the stems from the cherries, red grapes, and green grapes.

3. Cut The Fruit
Cut the cantaloupe and pineapple into pieces that are no larger than a clementine.
Then, arrange the diced fruit on separate plates with a paper towel to dry out the extra juices.
Place the plate in the fridge for about 30 minutes.
This will help prevent your fruit tray from becoming soggy.

Step 4: Arrange The Fruit
If you are using more than one fruit of the same color, then mix the fruits together in a bowl before adding them to your tray.
Next, determine where to place your fruit, based on the size and shape of your serving tray.
The serving tray that I used is 13 inches long, so I planned for about two-inch rows for each color fruit.
If you are including fruit dip, position that on your serving tray first, and then beginning layering the fruit around it.

How To Make A Rainbow Fruit Tray – FAQ
What fruits are good for a fruit tray?
The best fruits for a fruit tray include:
- Red: cherries, raspberries, strawberries, cranberries
- Orange: cantaloupe, clementines, mango, oranges
- Yellow: pineapple
- Green: green grapes, honeydew, kiwi
- Blue: blueberries, blackberries
- Purple: red grapes
Avoid fruits that contain a lot of water (e.g. watermelon), brown easily (e.g. bananas), and can’t easily be cut (e.g. plums).
How much fruit do I need for 25 guests?
I recommend 15 cups of fruit to serve 25 people.
However, the amount of fruit you need really depends on your intent of the fruit tray.
I used approximately 11 cups of fruit on my tray to serve 18 people.
Can I make a fruit platter the night before?
Yes and no. You can wash, dry, and cut the night before, but you shouldn’t arrange your fruit tray until about 15 minutes before you plan on serving it.
Store the prepared fruits in individual air-tight containers with a paper towel (to absorb excess water) in the fridge.
Do you cut strawberries for a fruit tray?
I think fruit trays look the best when all the fruit is about the same size.
Therefore, I recommend cutting the strawberries in half, or in quarters, depending on the size of the strawberries.
Is it cheaper to make your own fruit tray?
Yes, it is pretty much always cheaper to make your own fruit tray than it is to buy one from the store.
Rainbow Fruit Platter Ideas
I know I’ve said this multiple times now, but there really are so many great occasions to serve a rainbow fruit tray:
- Pride Month
- St. Patrick’s Day
- Mother’s Day Brunch
- Thanksgiving / Friendsgiving
- Birthday
- Barbeque/cookout
- Dessert table
Rainbow Platter For Pride Month
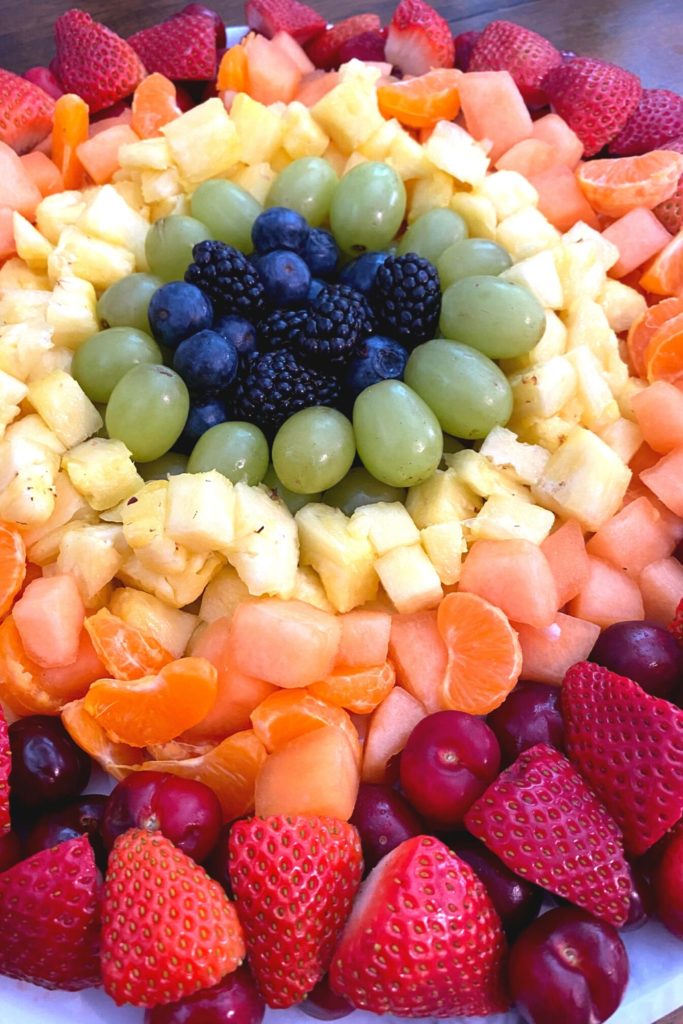
Arrange your fruit in the shape of a rainbow (as pictured above).
Check out other recipes for Pride Month here.

Rainbow Fruit Tray With Marshmallows
Arrange your fruit in the shape of a rainbow and add ‘clouds’ (mini marshmallows) and ‘gold’ (Rolos), as pictured below.
Check out other recipes for St. Patrick’s Day here.

Rainbow Fruit Salad For Other Occasions
- Mother’s Day Brunch: spring is the perfect time to serve a rainbow fruit tray because most fruits are in season. So if you are planning a Mother’s Day Brunch at home, a mini rainbow fruit tray would be a perfect addition to the menu (or your Mimosa Bar).
- Thanksgiving / Friendsgiving: I love to include fruit on my Friendsgiving dessert table because many people like something light and sweet for dessert, instead of only pie.

- Birthday: I think we all have that friend that doesn’t have much of a sweet tooth. A rainbow fruit tray is a great alternative to a birthday cake, cookies, or brownies.
- Barbeque/cookout: Why spend extra time in the kitchen, or turn on the oven, when you can simply slice up some fruit and get outside to enjoy the BBQ with your friends and neighbors. Skip a complex recipe and having to turn on the oven. Slice up some rainbow fruit and get outside 🙂
- Dessert table: For whatever reason, most people rarely think of fruit as dessert (I used to be one), but it’s a great way to add color and variety to your dessert table.
I Want To Hear From You!
What fruit did you use for your rainbow fruit tray? When did you serve it? Do you have any questions not covered in this post? Ask and share your feedback in the comments section below!
Also, if you made this tray, I’d love to see it!
Tag me on Instagram at @lifestyledbysam_

Rainbow Fruit Tray
Equipment
- Serving tray
- Cutting board
- Chefs knife
- Mixing bowls
- Sauce bowls
Ingredients
- 1 cup Cherries
- 1 cup Raspberries
- 1 cup Canteloupe (~1/3 of a whole)
- 2 cups Pineapple (~1/2 of a whole)
- 2 cups Green Grapes
- 1 cup Blackberries
- 1 cup Blueberries
- 2 cups Red Grapes
- 1 cup Fruit Dip optional
Instructions
- Prepare the fruit dip of your choice (if using)
Prepare the fruit
- Wash and dry the raspberries, cherries, grapes, blueberries, and blackberries.
- Peel the clementines.
- Remove the stems from the cherries, red grapes, and green grapes.
Cut the fruit
- Cut the cantaloup and pineapple into pieces that are no larger than a clementine.
- Arrange the diced cantaloup on a plate with a paper towel, so that the paper towel can absorb excess juice, for about 30 minutes.
- Arrange the diced pineapple on a plate with a paper towel, so that the paper towel can absorb excess juice, for about 30 minutes.
Arrange the fruit
- Mix the raspberries and cherries in a small bowl. Set aside.
- Mix the cantaloupe and clementines in a small bow. Set aside.
- Mix the blackberries and blueberries in a small bowl. Set aside.
- Determine where to place your fruit, based on the size and shape of your serving tray.
- Position the fruit dip in the upper left section of the tray, if using a rectangular tray. Or position the fruit dip in the center of the tray, if using a round tray.
- Add the red fruit to the tray. Followed by orange, yellow, green, blue, and purple.


